DIY Electronic Piano NE555 Electronic Music Organ Parts Eight Notes Kit

![NE555 Electronic Organ Parts Eight-note Electronic Organ Kit DIY Fun Production-1]()

![NE555 Electronic Organ Parts Eight-note Electronic Organ Kit DIY Fun Production-2]()

![NE555 Electronic Organ Parts Eight-note Electronic Organ Kit DIY Fun Production-3]()

![NE555 Electronic Organ Parts Eight-note Electronic Organ Kit DIY Fun Production-1]()

![NE555 Electronic Organ Parts Eight-note Electronic Organ Kit DIY Fun Production-2]()

![NE555 Electronic Organ Parts Eight-note Electronic Organ Kit DIY Fun Production-3]()


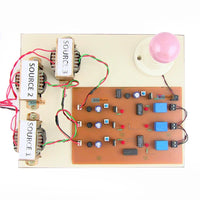
Place Components on the PCB: Start with the smallest components, such as resistors and capacitors. Insert the NE555 timer IC into its designated slot. Attach the push buttons corresponding to each note.
Solder the Connections: Carefully solder each component in place, ensuring good connections. Trim excess leads after soldering to prevent shorts.
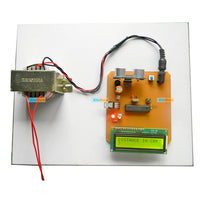
Connect the Speaker: Attach the speaker wires to the appropriate points on the PCB.
Install the Battery Holder: Connect the battery holder wires to the power input points on the PCB.
Test the Circuit: Insert the battery and press each button to ensure all notes are functioning. Troubleshoot any issues with solder connections or component placement. Usage
Play Music: Press the buttons to produce different notes and create simple melodies.
Educational Tool: Use it as a learning tool to understand how oscillators and timers work in electronic circuits.
Customization: Experiment with different resistor and capacitor values to alter the notes and sounds produced.
-24%


DIY Electronic Piano NE555 Electronic Music Organ Parts Eight Notes Kit
Available:In Stock
- Product SKU: KG1097
₹ 189
₹ 249
Need Volume Discounts? Deals are specially designed for you. Click here
Need Customization? Provide us more details Click here
🏠
Warehouse Details:


Specification
Description
DIY Electronic Piano NE555 Electronic Music Organ Parts Eight Notes Kit
The NE555 Eight-Note Electronic Organ Kit is a fun and educational DIY project that allows you to build a simple electronic organ using the NE555 timer IC. This kit is perfect for beginners and electronics enthusiasts exploring the basics of electronic circuits and sound generation.Technical Details
- IC: NE555 Timer
- Power Supply: 9V battery (not included)
- Number of Notes: 8 distinct musical notes
- Dimensions: Varies by kit design, typically small and compact
- Output: Sound through a small speaker
Assembly Instructions
Prepare the Components: Ensure all components are present and in good condition. Identify each component using the provided schematic and parts list.Place Components on the PCB: Start with the smallest components, such as resistors and capacitors. Insert the NE555 timer IC into its designated slot. Attach the push buttons corresponding to each note.
Solder the Connections: Carefully solder each component in place, ensuring good connections. Trim excess leads after soldering to prevent shorts.
Connect the Speaker: Attach the speaker wires to the appropriate points on the PCB.
Install the Battery Holder: Connect the battery holder wires to the power input points on the PCB.
Test the Circuit: Insert the battery and press each button to ensure all notes are functioning. Troubleshoot any issues with solder connections or component placement. Usage
Play Music: Press the buttons to produce different notes and create simple melodies.
Educational Tool: Use it as a learning tool to understand how oscillators and timers work in electronic circuits.
Customization: Experiment with different resistor and capacitor values to alter the notes and sounds produced.
Features
- DIY Electronic Piano Kit with eight musical notes
- Based on NE555 Timer IC for sound generation
- Adjustable Sound Frequency via potentiometers
- Simple Circuit Design for easy assembly and learning
- Operates on 3V-5V Power Supply
- Touch-sensitive Keys for playing different tones
- Great for STEM Learning and electronics projects
- Compact and Lightweight for easy handling
Applications:
- STEM Education and Learning
- Electronics DIY Projects
- Basic Music Training for Beginners
- Sound Generation Experiments
- School and College Electronics Labs
- Understanding NE555 Timer Applications
- Interactive Toy Development
- Fun and Creative Hobbies
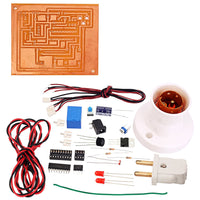
Package Includes
- 1 x DIY Electronic Piano NE555 Electronic Music Organ Parts Eight Notes Kit